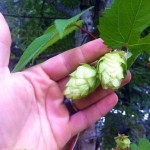
Pear Cider (Process and Recipe)

Thursday, October 1st, 2009

So we decided to make hard pear cider (perry, or poiré) this year.

There are some good recipes on the web, but very little documentation on the complete process. Hopefully this log of our process will fill in the gaps for you. Before we begin, here are some of the essentials.

  • Type of fruit: Ripe, organic Bartlett pears.
  • Amount of fruit: 10lbs of fruit produced 6lbs of cider – 2800ml  or about 3qt.
  • That’s about: 65-75lb of fruit for 5gallons at full OG.
  • However: Full OG was 1.070, so we added water to bring it down to 1.055.

32382502Picking the pears

09-27-2009

Finding cheap pears was more difficult then I originally imagined. We were planning to juice the fruit and thus didn’t really care about it’s appearance. I put an ad on craigslist wanted – asking for anyone who might have a tree around town, so that we might collect the windfalls. There were a few leads, but none of them produced many pears.

So, I started looking at u-pick options. Oregon is a great place to pick fruit, but pears ranged in price from $0.50 to $1.00 a pound and many of the options were 50+ miles away. Then, by chance I found a much more local farm that was offering organic Bartlett pears for only $0.20/lb.

32366104It is a small farm is called Vancil-Polehn and I found them via this ad. Here is an excerpt: “Organic Bartlett pears .20 per lb for Pears (some have scabs on them that is the reason behind the cheap prices) STILL TASTE WONDERFUL!  OPEN FROM 9am-5pm”

They are in located in the Redland/Oregon City area about 17 miles from my house. Much better then heading all the way to Hood River. If you go, make sure to wear shoes and long pants. There are blackberries around many of the trees that want to gobble up your pears. You might also consider bringing your own fruit picking device. We were happy to use the can-on-a-stick that they have available, but it was no the most efficient method.

It took four of us a few short hours to pick 225lbs of pears.

photo(4)Ripening the fruit

09-27-2009

Much of the fruit was very firm. I decided to lay it out on a tarp in the guest bedroom to ripen. It was set out on Sunday. By Wednesday, all of the pears were yellow and giving off a pleasant aroma. They also started to attract fruit flys.

In hindsight, it may have been better to press the fruit green. Pressing the juice from the ripe/soft flesh ended up being problematic. Skip to “Pressing out the juice” for more details.

Grinding / Chopping / Scratting

09-30-2009

To coax the juice out, you first have to cut it into small pieces (commonly called scratting). Pressing whole pears will just result in frustration. The smaller the pieces, the more efficient your pressing will be.

The options are 1) spend all day chopping by hand, 2) rent an expensive grinder 3) build your own scratter! Guess which one we went with?

Our scratter is a smaller version of this design. It was made using a rolling pin, stainless screws, a rod, some bearings and a 1/2hp motor. The motor was originally 1800rpm – so gearing was added to slow it down to around 850rpm.

As you can see, the scratter makes quick work of the fruit – producing thousand of tiny shreds, ready for pressing. Another advantage is that the screws don’t seem to cut the seeds. This will help keep out the cyanide.

Just note – the motorized version is fun and easy to make. However, it is also very dangerous. If it can grind apples, think what it would do to a finger… Please be safe.

pears - 06Pressing out the juice

09-30-2009

Once the pears are shredded, it is time to press out the juice. We were lucky enough to borrow a small press from our friends. Prior to pressing the pears, we did a dry run with a bucket of windfall apples. the press seemed to work quite well.

However, the pears proved to be more difficult.

We placed the pear shreds in a nylon bag (open at the top) inside the press and then applied pressure to the top of the press as we had done with the apples. Unlike the apples the pears seemed to “sauce” and squirt out around the edges of the press top.

pears - 12So we tried closing the top and pressing. This worked a little better, but too much pressure would cause the fine nylon bag to burst – sending pear in all directions.

The best method involved squeezing the bag by hand, then  applying pressure with the press. It seemed to work well, giving 6lbs (3 quarts) of cider for every 10lbs of fruit – or 60% efficiency. However, it took hours to go through all 175+lbs of pears. The remaining 40% of semi-dry, pear pulp was added to the compost pile.

I now believe that the problem might have been avoided by working with less-ripe fruit. The cells of fully ripe, yellow bartletts seem to hold on to the juice. This probably has to do with how the pectin sets up in ripe cell.

pears - 10Searching the web, there were several suggestions including: using different mesh bag styles, adding adjuncts like rice hulls and even freezing the fruit. If you have a bunch of ripe pears on hand, please experiment and let us know. As for me, I plan to just juice them earlier next time.

Setting the Cider

09-30-2009

From 165lbs of pears we ended with over 11gallons of raw cider. It seemed a little “gritty” so we strained it through some fine nylon to remove many of the particulates that had come from the pressing process.

pears - 16Then we tested the sugar content it with a hydrometer. It turned out to be 1.070, much higher then our recipe called for (1.045). Water was added to bring the OG to about 1.055. This is still a bit higher then our recipe called for, but should give a pleasing amount of alcohol near 5% after fermentation. An important thing to remember is that, unlike apples, pears have some un-fermentable  sugars. So keep your OG a little higher then you would with other ciders.

The addition of H20 brought it to about 13 gallons of cider divided between 3 buckets.

Then the chemicals were added. Each bucket received: 5 campden tablets (crushed) to kill the wild yeast, 1/2tsp of yeast nutrient and 3.75tsp of pectic enzyme to help break down all that nasty pectin.  This should sit for 12 hours before adding any yeast.

Remember to cover the buckets with a clear towel to keep the creepy-crawlers out.

Last Roll - 03

Fermentation Begins

10-01-2009

One packet of dry Pasteur Champagne yeast is gently sprinkled on top of each bucket. The directions say to ferment at 65-75F, but many sources including wikipedia suggest: ” a temperature of 4–16 °C (40–60 °F). This is low for most kinds of fermentation, but is beneficial for cider as it leads to slower fermentation with less loss of delicate aromas.” So, I wil be leaving these in the basement.

10-02: The next morning shows only minimal signs of yeast growth on the surface. Each container is given a vigorous stir (it’s last) to distribute the yeast.

10-07: For the past 5 days the cider has been really active. You can see the surface churning from all the CO2 that is being produced. However, there is surprisingly little foam (almost none).  This is in stark contrast to some apple cider that I had set up a week prior – it produced  a head of foam 2-inches thick each morning.

Racking

Last Roll - 38

10-12: Fermentation slowed and the three buckets were racked into two 6 gallon carboys. I left the thick sludge in the buckets, but was not too concerned about picking up sediment. By the next morning you could see a clear line where the sediment had already begun to settle.

Gravity was a surprisingly low 1.010 to 1.012 (depending on bucket). So…

  • (1.055-1.011) * 125 = 5.5 % alcohol by volume

The only problem with the high attenuation is that most of the sugars have been converted to alcohol – leaving the cider incredibly dry. At this point, you can barely taste the delicate pear flavors. I suspect that we will want to re-sweeten the cider before bottling. However, flavors change/develop in strange ways during secondary fermentation. So, we will just have to wait and see.

DSCN3878

11-08: It has been a month and yeast/pectin has settled quite a bit. Time to rack!

Five  gallons of liquid was syphoned from each bottle and into a fresh clean carboy. This means that there was almost a gallon of trub (dead yeast, pectin and other sediment) that was discarded.

We also mixed in something that many of you might find odd: egg white…

Egg white is a common fining agent in wine. The proteins bond to free-floating particles, weight them down and help them to settle to the bottom.

DSCN3882

This results in a clearer, less cloudy liquid. It only takes a little. Separate out the white from the yolk in a clean dish and double with water. Add a small pinch of salt to emulsify and then whisk with a fork. We added just a few table spoons to each batch. Vegans will have to use a different fining agent like bentonite (just not isinglass).

The cider is now a light, cream yellow in color. The bottle in the front of this photo is the pear cider. For comparison, the rear carboy is filled with an apple cider of a similar age. Both ciders are much clearer the a few weeks ago, but still slightly cloudy. The egg should help with that.

Bottling

To be updated.

Pups

Saturday, March 1st, 2008

“Some” photos of my parents dogs. They are both mutts rescued by the Oregon humane society.

Mabel

Has the lighter brown, tiger-striped coat. She is either a Plott hound, or Black Mouth Cur mix.

Indigo (Indy)

Is much larger and has grey/black spots. She is most likely a Catahoula mix.

(more…)

To catch a dinosaur

Monday, February 25th, 2008

This weekend we went out fishing – for sturgeon.

These prehistoric looking fish can live for hundreds of years growing up to 18 feet long. In Oregon, you use barb-less hooks and can only keep fish of a certain size – between 4 and 5 feet!

While we didn’t nab any keepers, the four that were pulled in seemed big to someone (me) who has only ever fished for trout.

01.jpg02.jpg03.jpg07.jpg08.jpg06.jpg04.jpg05.jpg09.jpg10.jpg


The experience was also quite different for lake/bank fishing. We set out early Sunday in Gary’s (Sam’s dad) boat and sunk our lines just noth of the St. Johns Bridge. Gary estimated that the water was about 75′ deep. The sturgeon seemed to the nibble the bait around the hook, rather then swallow it whole.

This meant that your timing had to be perfect – as to grab the fish mid-nibble. The whole thing gave me a bit of trouble, but there was a positive side…

Rather then swallowing the hook, every fish was caught near the edge of it’s mouth, making the release very easy and leaving the fish relatively undamaged.

APS11: Are you buzzword compliant?

Tuesday, October 16th, 2007

Changing Web 2.0 from Passing fad to Development Methodology
Kyle Bowen, Manager of Information, Purdue University

Looking at buzzwords of yesterday: Webmaster, Information Communication Highway

“The buzzwords of today are the litmus test for tomorrow.” But, are there any lessons that we can learn.

  1. Create many small releases: under promise and over deliver.
  2. Web applications should be simple: If it requires training, then it is too complicated!
  3. Reduce overhead: There are other people who can use a keyboard. (they created a form generator – the user designs and tries, but does not launch)
  4. Use interactivity to do work: No need for rich apps when middle-class ones will do. (edit in place, auto complete/suggest, one click adds, modal windows, drag and drop)
  5. Video’s compelling: It’s almost like being there.
  6. Brand your applications: There are already too many acronyms. (personalizes services)
  7. Be a service provider: Purveyors of cool. Make sure you charge everyone! Otherwise they will not respect you.

Who has people at their college that should not be making webpages (secretaries, manages, ect…). For them Purdue has created a “commons area” where they can have a space off of the main site. Best one’s are featured.

This guy is a great presenter. Hilarious, on topic and engaging!

The Oregon judges give him a perfect 10.

Student Success and Retention Conference

Saturday, February 10th, 2007

pathways.gifThe Student Success and Retention Conference was held February 8-9, 2007 at Portland State University’s University Place, 310 SW Lincoln Street Portland, Oregon. The SSR Conference was sponsored by the Joint Boards Articulation Commission, Oregon Department of Community Colleges and Workforce Development, the Oregon University System, and Oregon’s community colleges.Together, Andrew Roessler and I were invited to present: (more…)

Back from the Pacific Crest Trail

Thursday, October 20th, 2005

Snow on the PCTOn April 17, 2005 my partner and I set out from the Mexican border for a six-month backpacking expedition to reach Canada by way of the Pacific Crest Trail.

The PCT travels over 2650 miles through California, Oregon and Washington. It traverses a wide variety of landscapes ranging from the waterless deserts of southern California to glacier-capped peaks of the Pacific Northwest.

This trip took years to plan, and was more eventful and inspiring then we ever could have imagined. Due to injury and illness, we did admittedly have to skip a few notable sections of the trail this season. Yet by the end, we completed over 2400 miles and gained a much greater respect for nature (as well as our sore feet).

During the course of the adventure, we logged hundreds of journals, took thousands of pictures and even captured a few short movies.

Now that the trip is at an end, I have taken some time to compile everything. You can find all of the logs at www.TrailB.com/PCT.

Photos of the PCT

Thursday, October 20th, 2005

pacific-crest.gifOn April 17, 2005 my partner and I set out from the Mexican border for a six-month backpacking expedition to reach Canada by way of the Pacific Crest Trail. The PCT travels over 2650 miles through California, Oregon and Washington. During the course of the adventure, we logged hundreds of journals, took thousands of pictures and even captured a few short movies.