Fermented Pickles (and green beans, and carrots)
Wednesday, October 5th, 2011
Every fall, we make pickles and dilly beans. It’s fun, easy and saves lots of money – if you eat pickled vegetables in the amount that my family does. Normally, we can the vegetables in a vinegar solution. Then last year, I discovered how easy it is to create true sour pickles at home… Pickles that rival those found aging in a barrel at a New York delicatessen.
 Get your produce ready
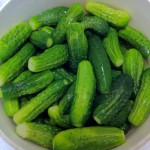
This time of year is a great time to pick up pickling cucumbers. Go for the small to medium size ones. And make sure they are fresh – they need to be processed within 24hours of picking, or be refrigerated. Otherwise, they will start to mold. This year we picked up a 25lb sack of local cukes for for under $20. This is enough for over 5 gallons of pickles!
Gently wash your cucumbers, making sure not to bruise them. You also need to be sure to cut off any remnants of the flowering end. The blossom contains enzymes that help the fruit decompose – great for freeing the seeds to germinate – bad for creating pickles. We simply slice off both ends.
We also picked up 15lbs of green beans and 35lbs of large “juicing” carrots. Last year, I was surprised at how well the fermented carrots and dilly beans turned out. Make sure to snap the stem end off the green beans and give them a good wash. The carrots were peeled and sliced into large chunks.
 Prepare the containers
Ceramic crocks may be the posh way to go, but for the rest of us there are food-grade, plastic buckets. We ended up needing four, 5-gallon buckets to fit all of the produce mentioned above.
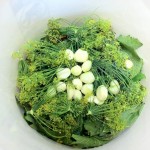
After cleaning each buckets throw the following into the bottom:
– A thick layer of grape/strawberry leaves: these leaves are rich in alum and tannins, two compounds that will help to keep your pickles crisp as they ferment. I have also heard that you can use, horseradish, cherry, or eve oak leaves.
– Dill: the most important pickle spice. I usually throw in several large, fresh heads and a few spoon fulls of dried dill.
– Garlic: at least a head of fresh, whole garlic. I actually used 2-3 heads per bucket, but I really like garlic. Do you know the trick to peeling garlic?
– Other spices: ahis is where you can get creative. I usually include coriander, black peppercorns, mustard seed, chili flacks and whole, dried chilies.
Now, add the produce. You can pack the buckets fairly tight, but be sure to leave a few inches on top to cover with brine.
 The brine
This is where the magic happens.
A salt brine inhibits the bad bacteria, but allows lactobacillus to thrive. The salt solution can be anywhere from 3.5% to 10%. Lower concentrations will ferment faster, but also tend to spoil quickly. Higher concentrations will last longer, but result is high sodium picked that need to be desalinated before eating.
I like my brine around 5.4% – strong enough to create what are known as “full sours”. To get this concentration, you need to add about 3 tablespoons (15 milliliters, or 17 grams) of salt per quart of water.
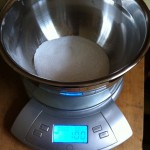
An accurate kitchen scale makes the job easy. Simply mix 100 grams of salt into a 1/2 gallon container, fill with water and pour it over the produce. Make sure to fully cover everything with an inch (or two) of brine.
Make sure to not use table salt that contains iodine and anticaking ingredients. Pickling and sea salt both work well. Or, you can be cheap (like me) and make your own pickling salt. Simply throw kosher salt in a food processor until it turns into a fine dust.
 Start your fermentation!
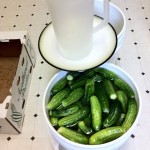
Place a dinner plate over the produce and weigh it down with something heavy. I find that quart jars filled with water work fine. The important thing is to keep the pickles under the brine. Any contact with the air will cause them to mold.
Now cover the buckets with a towel and store them somewhere cool. The basement seems to work well. Just be sure to check on them every day or two.
Fermentation usually starts within a few days to a week. There is lactobacillus in the air all around us and it is usually enough to get everything started. If you have an incredibly salty brine, you can add a little whey from your favorite, non-pasteurized yogurt.
Don’t freak out if mold, or scum starts to form on the surface. This is natural. Just skim it off as it forms. Your pickles are safe as long as they remain below the surface of the water.
If you decide to can them, be sure to add 1cup per gallon of brine. This ensures that the ph is in the correct range for long term storage.

stacy Says:
i used your recipe for green beans today. when will they be ready to eat and how long with they last? do they need to be refrigerated at some point? thanks!
Gabriel Says:
It all depends on the temperature and salt content. Warmer temps and lower saline speed up the fermentation. I would start sampling by the end of the week. Once you are happy with the flavor, you will need to move them to the fridge – or can them.
Gabriel Nagmay Says:
Another year, another round of fermented pickles.
One thing that I forgot to note was adding vinegar. Fermentation produced lactic acid and shouldn’t require extra acid – that said, vinegar can be added before canning as a saftey measure.
The USDA recommends 1/2cup of 5% vinegar added to each gallon of brine. That’s 2tbsp per quart.
To can, I simply:
Strain the pickles and spices from the brine and stuff the jars.
Heat the brine in a large pot adding 1/2 cup vinegar per gallon
Pour in the brine and process
Brian Birnie Says:
Can one do green beans this way also?? Sliced cucumbers?? Thank You.